


Back That App Up: Gaining Root on the Lenovo Vibe
In May of 2016, Mandiant’s Red Team discovered a series of vulnerabilities present on Lenovo’s Vibe P1 Android-based mobile device that allow local privilege escalation to the user “root”. Mandiant disclosed these vulnerabilities to Lenovo in May of 2016. Lenovo advised Mandiant that it should work with Motorola, who it had acquired and was now responsible for Lenovo’s mobile product portfolio. Mandiant then disclosed the vulnerabilities to Motorola for correction. The vulnerabilities discovered by Mandiant’s Red Team were as follows:
- Local backups enabled in Lenovo “Security” application (CVE-2017-3750)
- Local backups enabled in Lenovo “Idea Friend” application (CVE-2017-3749)
- Improper access controls in “nac_server” binary (CVE-2017-3748)
The official Lenovo advisory that includes the affected devices and software versions can be found on Motorola’s website. Motorola has indicated that these vulnerabilities have since been patched, and the company supported Mandiant regarding the release of this post.
We have provided general details in an FAQ, and a technical analysis of the vulnerabilities follows.
FAQ
What devices are affected and (potentially) how many devices are affected?
The vulnerabilities described in this post affect a subset of Lenovo-branded devices. A full list of the affected devices can be found within Motorola’s official advisory. Note that the vulnerabilities described in this post do not affect the Android Open Source Project (“AOSP”) developed by Google.
How is the issue being addressed?
Motorola has redesigned the affected mechanism to use a more secure process.
How would an attacker exploit these vulnerabilities?
The described exploit chain requires local, physical access to a device. Therefore, is very unlikely to see this exploit “in the wild”. Users are recommended to update their devices to the most recent software package provided by Lenovo, and protect their devices using strong lock screen settings.
Who discovered these vulnerabilities?
Jake Valletta (@jake_valletta)
Technical Analysis
Now we will walk through the exploitation process Mandiant’s Red Team used to obtain code execution as the user “root” by chaining the disclosed vulnerabilities together in a unique way.
Identifying Our Target: “nac_server”
A popular process for escalating privileges on Android devices is to enumerate locally listening sockets. While AF_INET sockets (think IP addresses and TCP/UDP ports) listening locally are rare on Android devices, AF_UNIX sockets (hereforth refered to as “UNIX sockets”) are used frequently by native Android daemons, including “netd”, “installd”, and “vold”, most of which run with elevated privileges. UNIX sockets are represented as files on the filesystem, and are typically bound to socket-type files in the “/dev/socket/” directory. A specific subset of UNIX sockets bind to the abstract namespace (which are not bound to a filesystem-backed file), and are denoted with a leading ‘@’ character, such as “@android:debuggerd32” and “@jdwp-control”.
Using the “netstat” module of the “busybox” utility on a test Vibe, we can note interesting abstract sockets that do not appear to be part of the Android Open Source Project (“AOSP”), as highlighted in Figure 1. Note that we’ll be using the Android Debug Bridge (“adb”) to interface with a test Lenovo Vibe throughout the post.
To find the binary that may be responsible for these UNIX sockets, a string search across all DEX bytecode and binaries on the device can be useful. A string search across system binaries (located on the device in the directories “/system/bin/”, “/vendor/bin/”, and “/system/xbin/”) indicated that the strings “nac_server”, “nac_safe_server”, and “supercmdlocalsocket” were all present in the binary file “/system/bin/nac_server”, a non-AOSP binary.
To confirm this, we can extract and view the “/init.rc” file present on the Vibe. In this file, we can see that Lenovo added an init service called “nac_server”, shown in Figure 2.
The “init” process registers the “nac_server” service and runs as the user “root” at system boot. We can confirm this by checking the “init.svc.nac_server” system property and by viewing the running processes on a test device, shown in Figure 3 and Figure 4 respectively. It is also important to note that the “nac_server” binary was running under the SE for Android (“SEAndroid”) context “nac_server”.


Since we know this process runs as a privileged process and listens on UNIX sockets, we shifted our analysis to the “nac_server” binary to understand its full capabilities.
Binary Analysis of the “nac_server”
To map out the capabilities of the “nac_server” binary, Mandiant’s Red Team worked along side FireEye Labs Advanced Reverse Engineers (“FLARE”) (shoutout to @m_r_tz). As stated above, the “init” process starts “/system/bin/nac_server” at system boot as the user “root”. Once started, “nac_server” spawns three threads, each bound to an abstract UNIX socket: “nac_server”, “nac_safe_server”, and “supercmdlocalsocket”. Each of these threads expects to receive a file path from a client across the socket. “nac_server” then performs the following security checks based on the file path:
- Tokenizes the file path based on “/”, and assumes the third element is the calling package name, and the fourth argument the file to execute. The package name is then checked against a whitelist, shown in Figure 5.
- Parses the “/data/system/packages.xml” file to check if the calling package name is installed and the signature matches a list of internal signatures. One of the allowed signatures is depicted in Figure 6.
After validating the file path, “nac_server” copies the file from the fourth argument to the directory “/data/local/root_channel/[package_name]”, sets the SEAndroid context to “root_channel”, and then executes the file using the “system(..)” function as the user “root”. We’ll be exploring the significance and capabilities of the “root_channel” SEAndroid context in the following section.
In short, the “nac_server” binary provides a mechanism for applications signed by Lenovo to execute files as a privileged process and context. There are obvious malicious reasons to include this functionality; however, Mandiant’s research suggests that Lenovo used this functionality to create custom “iptables” firewall rules from the Android runtime.
Because the “nac_server” falsely assumes the caller is the third token of the file path, we are able to confuse the service and feed it a file that we control (CVE-2017-3748).
Understanding SEAndroid Contexts
SEAndroid is a security feature added to Android devices starting in Android 4.3 (“Jelly Bean”). One of the key reasons for adopting SEAndroid was to provide granular security control of powerful UIDs such as those associated with “system”, “radio”, and “root”. Note that this section will not be a complete tutorial on SEAndroid (a more comprehensive description of SEAndroid can be found here). The SEAndroid-related files for our analysis are as follows:
- /sepolicy – Binary kernel policy file loaded at system boot
- /seapp_contexts – Rules for determining the SEAndroid domain and type of Android applications
- /etc/security/mac_permissions.xml – x.509 certificate information to determine the correct domain to apply when the Zygote process spawns a new application (more information on the Zygote process can be found here)
“nac_server” UNIX Socket Analysis
Unfortunately for us, attempting to connect to any of the three aforementioned UNIX sockets as the built-in “shell” user results in SEAndroid policy violation. Figure 7 shows a “Permission denied” error when we attempted to connect to the UNIX socket “supercmdlocalsocket” using the “socat” utility.

Figure 8 shows the SEAndroid policy violation captured in the Android log buffers.

In Figure 8, we see that the operating system denied the source context “shell”, the “connectto” permission of the “unix_stream_socket” class for the “nac_server” type. As a researcher, we now want to know: who can access this permission? To answer this, we can use the “sesearch” utility as follows:

Running this tool indicates that three SEAndroid domains possess the correct permission: “system_app”, “platform_app”, and “unconfineddomain”. Fortunately, there are over 100 applications running in either the “platform_app” or “system_app” security domain. Based on this, our next goal is to achieve code execution in either the “system_app” or the “platform_app” domains so that we can connect to the “nac_server” UNIX sockets.
“root_channel” Analysis
It is also worth exploring the capabilities of the “root_channel” SEAndroid context that the “nac_server” binary applies just prior to executing the command. On the Lenovo Vibe, the “root_channel” context is quite powerful, and includes full access to application data and Android runtime and write access to the “/data/” filesystem. What this context lacks is the ability to mount or remount filesystems and disable SEAndroid (we will leave this as an exercise for the reader).
Triggering the “nac_server” Bug via Local Backups
Android introduced local backups in Android 2.2 (“Froyo”). Local backups allow a user with physical access to a device with USB debugging enabled to download application data for specific applications and restore this data back to the device. Determination of whether an application can be backed up is controlled by the “android:backupAllowed” attribute within an application’s “AndroidManifest.xml” file. By default, this value is set to “true” for all applications except applications running as the shared UID “android.uid.system”.
To create a backup of an application locally, we can use the “adb” command “backup” shown in Figure 10.

These local backups can then be unpacked using the open-source Android Backup Extractor (“abe”) and the “tar” utility. Since these backups are not signed, we are free to make changes to the backup, such as edit configuration files or even add new files entirely. To repackage the backup, we can reverse the steps and use “tar” (or the “pax” utility), “abe”, and finally the “adb” command “restore” to restore the backup on our device. Figure 11 shows the command to restore a backup.

Abusing Backups Part 1: Code Execution (CVE-2017-3749)
One particularly dangerous side effect of allowing local backups is that a malicious user can modify an application’s private files without the application knowing. This typically includes modifying configuration files to alter the behavior of the application (like changing your Angry Bird high score data), but in more rare cases, an attacker can modify supplemental DEX bytecode included as part of an application to take full control of an application. Note that an application’s primary DEX bytecode is processed upon installation and stored outside of the application’s data directory, so it is not a target.
This is the case for the Idea Friend application (“com.lenovo.ideafriend”), which is the Lenovo-branded contact manager application. This application did not run as a privileged UID, but it did run in the “platform_app” SEAndroid domain, shown in Figure 12.

Identifying and Modifying Supplemental Bytecode
If we create a local backup for the Idea Friend application using the aforementioned process, we will notice the directory “f/parse/” (which corresponds to “/data/data/com.lenovo.ideafriend/files/parse/” on a test device) contains 14 signed Java JAR archives, each containing DEX bytecode, as shown in Figure 13.

The DEX code included in the JAR files “ParseUtilBubble_8.jar” and “parseUtilMain_8.jar” is loaded dynamically by the Idea Friend application when launched, which means that if we can modify these JAR files, we can execute arbitrary code as the Idea Friend application. These JAR files are signed, which does not permit us to modify the contents of the archives; however, because our test device utilizes the Android Runtime (“ART”), the operating system automatically optimizes DEX bytecode using “dex2oat” to produce an unsigned ELF binary. To confirm this behavior, we can see two OAT files in the directory “r/app_outdex” (which corresponds to “/data/data/com.lenovo.ideafriend/app_outdex/” on a test device). Figure 14 shows the OAT binaries optimized from the JAR files “ParseUtilBubble_8.jar” and “parseUtilMain_8.jar” found in the directory “r/app_outdex/”, and Figure 15 confirms that these are ELF binaries (the file format used by ART).


Using techniques described in the Black Hat Asia 2014 white paper “Hiding Behind ART”, it is possible to create our own OAT ELF binaries given the original DEX bytecode. The process is summarized as follows:
- Disassemble the existing DEX bytecode. For this, we can use “baksmali”.
- Modify the disassembled DEX bytecode. In our case, we are going to add a LocalSocket client to connect to the UNIX socket “supercmdlocalsocket” within a method we know will be called by the Idea Friend application (keep reading for more on this).
- Reassemble the new DEX. We can use “smali” for this.
- Push the new DEX bytecode to our device with a filename that matches the exact length of the destination filename. For example, if our destination filename is “/data/data/com.lenovo.ideafriend/app_outdex/parseUtilMain_8.dex”, we need to push a file with the exact filename size of 63, or “/data/local/tmp/aaaaaaaaaaaaaaaaaaaaaaaaaaaaaaaaaaaaaaaaaaa.jar”. This is important for a later step.
- Manually invoke the “dex2oat” utility on our test device against the DEX bytecode to generate an optimized OAT file.
- Pull the new OAT binary from the test device.
- Replace the padded filename (which corresponds to the “dex_file_location_data” field) in the OAT DEX file header with the original file path. Note that because we padded it to the proper length, this will not affect any offsets in the binary. A text editor such as vim or 010 works here.
- Reset the “dex_file_location_checksum” CRC32 checksum in the DEX header to be that of the original OAT binary. For this, we can use “dexdump” to obtain the checksum, and “dd” to replace it.
We will use this process in conjunction with a local backup for the Idea Friend application to connect to one of the UNIX sockets exposed by the “nac_server” binary. First, we will need to modify one of the JAR files and insert our malicious code.
Creating the Socket Client
Our first step is to generate the bytecode to connect to one of the “nac_server”’s abstract UNIX socket. For this example, we have chosen to use the “supercmdlocalsocket” UNIX socket. We start by creating a Java class similar to Figure 16.
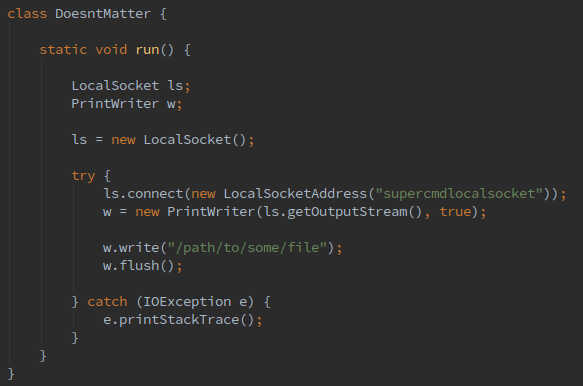
We can then compile this class, convert the class to DEX bytecode, and then disassemble using “smali”. Next, we find an opportune location to place this function.
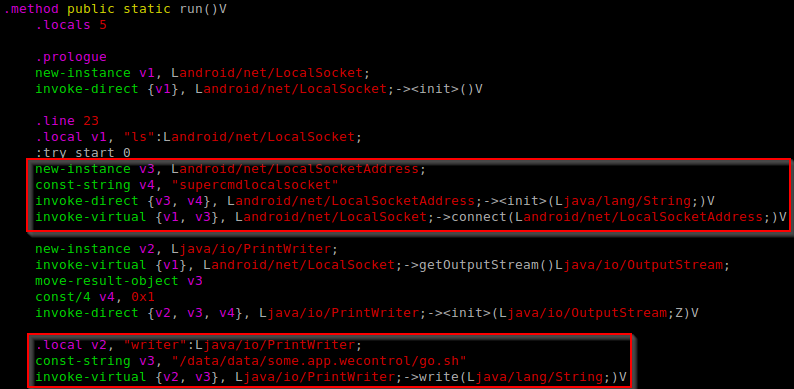
Inserting the Hook
By performing static and dynamic analysis on the Idea Friend application, we determined that the Idea Friend application executed the method “getBubbleViewVersion(..)” of the class “cn.com.xy.sms.sdk.Iservice.ParseUtilBubble” contained in the JAR “parseUtilBubble_8.jar” when the application was launched. Knowing this, we add our malicious code to this class, and insert our hook in the “getBubbleViewVersion(..)” method, as shown in Figure 17 and Figure 18.
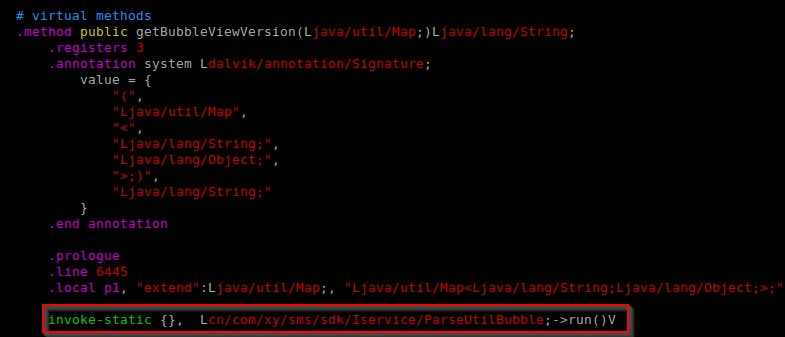
We can then perform steps 3-8 in the previously described process to generate our new ELF and restore our modified backup. All that remains now is to stage our malicious payload to be executed by the “nac_server” binary.
Abusing Backups Part 2: Staging a Payload (CVE-2017-3750)
We know that the Idea Friend application can communicate with the “nac_server” UNIX sockets, but unfortunately, the Idea Friend application is not in the whitelist checked by the “nac_server” binary. This means we will need to find a second application to stage our payload. By comparing the list of applications in the whitelist of “nac_server” (Figure 5) against applications that allow local backups, we can determine a few potential targets. We will use the Lenovo Security application (“com.lenovo.security”) as our target.
We will first follow the process outlined in the section “Abusing Backups Part 1: Code Execution” to generate a local backup for the Lenovo Security application. We then modify the backup to include the “go.sh” shell script depicted in Figure 19. The “go.sh” script will simply start a telnet server on TCP port 1234 when executed.

After re-packaging and restoring the backup, we can confirm that the file has been pushed to the device successfully using “ls”:

Chaining the Vulnerabilities
With our chain of vulnerabilities mapped out, we can now trigger the exploit with the following steps:
- Launch the Settings application and clear the application data for the Idea Friend application. This removes any legitimate OAT binaries that may already exist.
- Create a local backup of the Lenovo Security application.
- Modify the local backup to contain the “go.sh” payload.
- Restore the modified backup to the device.
- Create a local backup of the Idea Friend application.
- Modify the local backup to include our malicious OAT binary.
- Restore the modified backup to the device.
- Launch the Idea Friend application. Since the OAT binaries already exist (and appear valid), the application will execute our code. This will cause the Idea Friend application to connect to the UNIX sockets exposed by “nac_server” and pass the file path of our staged payload, “go.sh”. The “nac_server” will then execute our payload, starting the telnetd server.
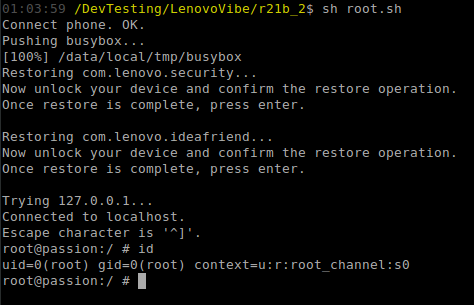
- Connect to the device using a telnet connection.
Figure 21 depicts this process, and shows the output of the command “id”, indicating that we have code execution as the user “root”, with SEAndroid context of “root_channel”.
Conclusions
Platform developers should exercise caution when exposing sensitive functionality using abstract UNIX sockets. Instead, use file-based UNIX sockets with the proper filesystem permissions and SEAndroid policy in conjunction with a privileged Android System Services to create a more structured and secure model. Based on follow up analysis, this is the model that Motorola has decided to use.
In addition, allowing backups on privileged applications can also be detrimental and should be disallowed. Just because an application is not running as a privileged Android user ID such as “android.uid.system”, does not mean that it cannot introduce vulnerabilities and be used to escalate privileges. Finally, applications should never allow executable code (Java classes, ELF binaries, or shared objects) within backups. This can be limited using a BackupAgent.
Prepare for 2024's cybersecurity landscape.
Get the Google Cloud Cybersecurity Forecast 2024 report to explore the latest trends on the horizon.