


Obscured by Clouds: Insights into Office 365 Attacks and How Mandiant Managed Defense Investigates
With Business Email Compromises (BECs) showing no signs of slowing down, it is becoming increasingly important for security analysts to understand Office 365 (O365) breaches and how to properly investigate them. This blog post is for those who have yet to dip their toes into the waters of an O365 BEC, providing a crash course on Microsoft’s cloud productivity suite and its assortment of logs and data sources useful to investigators. We’ll also go over common attacker tactics we’ve observed while responding to BECs and provide insight into how Mandiant Managed Defense analysts approach these investigations at our customers using PowerShell and the FireEye Helix platform.
Office 365
Office 365 is Microsoft’s cloud-based subscription service for the Microsoft Office suite. It is built from dozens of applications tightly embedded into the lives of today’s workforce, including:
- Exchange Online, for emails
- SharePoint, for intranet portals and document sharing
- Teams and Skype for Business, for instant messaging
- OneDrive, for file sharing
- Microsoft Stream, for recorded meetings and presentations
As more and more organizations decide to adopt Microsoft’s cloud-based offering to meet their needs, unauthorized access to these O365 environments, or tenants in Microsoft’s parlance, has become increasingly lucrative to motivated attackers. The current high adoption rate of O365 means that attackers are getting plenty of hands on experience with using and abusing the platform. While many tactics have remained largely unchanged in the years since we’ve first observed them, we’ve also witnessed the evolution of techniques that are effective against even security-conscious users.
In general, the O365 compromises we’ve responded to have fallen into two categories:
- Business Email Compromises (BECs)
- APT or state-sponsored intrusions
Based on our experience, BECs are a common threat to any organization's O365 tenant. The term “BEC” typically refers to a type of fraud committed by financially motivated attackers. BEC actors heavily rely on social engineering to carry out their schemes, ultimately defrauding organizations and even personnel.
One common BEC scheme involves compromising a C-suite executive’s account via phishing. Once the victim unwittingly enters their credentials into a web form masquerading as the legitimate Office 365 login portal, attackers log in and instruct others in the organization to conduct a wire transfer, perhaps under the guise of an upcoming acquisition that has yet to be publicly announced. However, we’ve also observed more effective schemes where attackers compromise those in financial positions and patiently wait until an email correspondence has begun about a due payment. Attackers seize this opportunity by sending a doctored invoice (sometimes based on a legitimate invoice that had been stolen earlier) on behalf of the compromised user to another victim responsible for making payments. These emails are typically hidden from the compromised user due to attacker-created Outlook mailbox rules. Often times, by the time the scheme is inevitably discovered and understood days or weeks later, the money is unrecoverable—highlighting the importance of contacting law enforcement immediately if you’ve fallen victim to a fraud.
The personal finances of staff aren’t off limits to attackers either. We’ve observed several cases of W-2 scams, in which attackers send a request to HR for W-2 information from the victim’s account. Once obtained, this personally identifiable information is later used to conduct tax fraud.
Conversely, APT intrusions are typically more sophisticated and are conducted by state-sponsored threat actors. Rather than for financial gain, APT actors are usually tasked to compromise O365 tenants for purposes of espionage, data theft, or destruction. Given the wealth of sensitive information housed in any given organization’s O365 tenant, APT actors may not even need to touch a single endpoint to complete their mission, sidestepping the many security controls organizations have implemented and invested in.
O365 Logs and Data Sources
In this section, we’ll touch on the multitude of logs and portals containing forensic data relevant to an O365 investigation.
Before we can begin investigating an O365 case, we’ll work with our clients to get an “Investigator” account provisioned with the roles required to obtain the forensic data we need. For the purposes of this blog post, we’ll quickly list the roles needed for an Investigator account, but during an active Managed Defense investigation, a designated Managed Defense consultant will provide further guidance on account provisioning.
At a minimum, the Investigator account should have the following roles:
Exchange Admin Roles
- View-only audit logs
- View-only configuration
- View-only recipients
- Mailbox Search
- Message Tracking
eDiscovery Rights
- eDiscovery Manager role
Azure Active Directory Roles
- Global Reader
Unified Audit Log (UAL)
The Unified Audit Log records activity from various applications within the Office 365 suite, and can be considered O365’s main log source. Entries in the UAL are stored in JSON format. We recommend using the PowerShell cmdlet Search-UnifiedAuditLog to query the UAL as it allows for greater flexibility, though it can also be acquired from the Office 365 Security & Compliance Center located at protection.office.com. In order to leverage this log source (and the Admin Audit Log), ensure that the Audit Log Search feature is enabled.
The UAL has a few nuances that are important to consider. While it provides a good high-level summary of activity across various O365 applications, it won’t log comprehensive mailbox activity (for that, acquire the Mailbox Audit Log). Furthermore, the UAL has a few limitations, namely:
- Results to a single query are limited to 5000 results
- Only 90 days of activity are retained
- Events may take up to 24 hours before they are searchable
Mailbox Audit Log (MAL)
The Mailbox Audit Log, part of Exchange Online, will capture additional actions performed against objects within a mailbox. As such, it’s a good idea acquire and analyze the MAL for each affected user account with the PowerShell cmdlet Search-MailboxAuditLog. Note that entries in the MAL will be retained for 90 days (by default) and timestamps will be based on the user’s local time zone. The MAL’s retention time can always be increased with the PowerShell cmdlet Set-Mailbox along with the AuditLogAgeLimit parameter.
At the time of writing this post, Microsoft has recently released information about enhanced auditing functionality that gives investigators insight into which emails were accessed by attackers. This level of logging for regular user accounts is only available for organizations with an Office 365 E5 subscription. Once Advanced Auditing is enabled, mail access activity will be logged under the MailItemsAccessed operation in both the UAL and MAL.
Administrator Audit Log
If the Audit Log Search feature is enabled, this supplemental data source logs all PowerShell administrative cmdlets (including command-line arguments) executed by administrators. If you suspect that an administrator account was compromised, don’t overlook this log! The PowerShell cmdlet Search-AdminAuditLog is used to query these logs, but note that the Audit Log Search feature must be enabled and the same 90 day retention limit will be in place.
Azure AD Logs
Azure AD logs can be accessed from the Azure portal (portal.azure.com) under the Azure Active Directory service. Azure AD Sign-in logs contain detailed information about how authentications occur and O365 application usage. Azure AD audit logs are also a valuable source of information, containing records of password resets, account creations, role modifications, OAuth grants, and more that could be indicative of suspicious activity. Note that Azure AD logs are only available for 30 days.
Cloud App Security Portal
For cases where OAuth abuse has been observed, information about cloud applications can be found in Microsoft’s Cloud App Security portal (portal.cloudappsecurity.com). Access to this portal requires an E5 license or a standalone Cloud App license. For more background on OAuth abuse, be sure to check out our blog post: Shining a Light on OAuth Abuse with PwnAuth.
Message Traces
Message traces record the emails sent and received by a user. During an investigation, run reports on any email addresses of interest. The message trace report will contain detailed mail flow information as well as subject lines, original client IP addresses, and message sizes. Message traces are useful for identifying emails sent by attackers from compromised accounts, and can also aid in identifying initial phishing emails if phishing was used for initial access. To obtain the actual emails, use the Content Search tool.
Only the past 10 days of activity is available with the Get-MessageTrace PowerShell cmdlet. Historical searches for older messages can be run with the Get-HistoricalSearch cmdlet (up to 90 days by default), but historical searches typically take hours for the report to be available. Historical reports can also be generated within the Security and Compliance Center.
eDiscovery Content Searches
The Content Search tool allows investigators to query for emails, documents, and instant message conversations stored in an Office 365 tenant. We frequently run Content Search queries to find and acquire copies of emails sent by attackers. Content searches are limited to what has been indexed by Microsoft, so recent activity may not immediately appear. Additionally, only the most recent 1000 items will be shown in the preview pane.
Anatomy of an O365 BEC
As mentioned earlier, BECs are one of the more prevalent threats to O365 tenants seen by Managed Defense today. Sometimes, Mandiant analysts respond to several BEC cases at our customers within the same week. With this frontline experience, we’ve compiled a list of commonly observed tactics and techniques to advise our readers about the types of activities one should anticipate. Please note that this is by no means a comprehensive list of O365 attacks, rather a focus on the usual routes we’ve seen BEC actors take to accomplish their objective.
Phase 1: Initial Compromise
- Phishing: Emails with links to credential harvesting forms sent to victims, sometimes from the account of a compromised business partner.
- Brute force: A large dictionary of passwords attempted against an account of interest.
- Password spray: A dictionary of commonly used passwords attempted against a list of known user accounts.
- Access to credential dump: Valid credentials used from a previous compromise of the user.
- MFA bypasses: Use of mail clients leveraging legacy authentication protocols (e.g. IMAP/POP), which bypass MFA policies. Attackers may also spam push notifications to the victim by repeatedly attempting to log in, eventually leading to the victim mistakenly accepting the prompt.
Phase 2: Establish Foothold
- More phishing: Additional phishing lures sent to internal/external contacts from Outlook’s global address list.
- More credible lures: New phishing lures uploaded to the compromised user's OneDrive or SharePoint account and shared with the victim’s coworkers.
- SMTP forwarding: SMTP forwarding enabled in the victim’s mailbox to forward all email to an external address.
- Forwarding mailbox rules: Mailbox rules created to forward all or certain mail to an external address.
- Mail client usage: Outlook or third-party mail clients used by attackers. Mail will continue to sync for a short while after a password reset occurs.
Phase 3: Evasion
- Evasive mailbox rules: Mailbox rules created to delete mail or move some or all incoming mail to uncommonly used folders in Outlook, such as “RSS Subscriptions”.
- Manual evasion: Manual deletion of incoming and sent mail. Attackers may forego mailbox rules entirely.
- Mail forwarding: Attackers accessing emails without logging in if a mechanism to forward mail to an external address was set up earlier.
- Mail client usage: Outlook or third-party mail clients used by attackers. Mail can be synced locally to the attacker’s machine and accessed later.
- VPN usage: VPN servers, sometimes with similar geolocations to their victims, used in an attempt to avoid detection and evade conditional access policies.
Phase 4: Internal Reconnaissance
- Outlook searching: The victim’s mailbox queried by attackers for emails of interest. While not recorded in audit logs, it may be available to export if it was not deleted by attackers.
- O365 searching: Searches conducted within SharePoint and other O365 applications for content of interest. While not recorded in audit logs, SharePoint and OneDrive file interactions are recorded in the UAL.
- Mail client usage: Outlook or third-party mail clients used by attackers. Mail can be synced locally to the attacker’s machine and accessed later.
Phase 5: Complete Mission
- Direct deposit update: A request sent to the HR department to update the victim’s direct deposit information, redirecting payment to the BEC actor.
- W-2 scam: A request sent to the HR department for W-2 forms, used to harvest PII for tax fraud.
- Wire transfer: A wire transfer requested for an unpaid invoice, upcoming M&A, charities, etc.
- Third-party account abuse: Abuse of the compromised user’s privileged access to third-party accounts and services, such as access to a corporate rewards site.
How Managed Defense Responds to O365 BECs
In this section, we’re going to walk through how Managed Defense investigates a typical O365 BEC case.
Many of the steps in our investigation rely on querying for logs with PowerShell. To do this, first establish a remote PowerShell session to Exchange Online. The following Microsoft documentation provides guidance on two methods to do this:
- Connect to Exchange Online PowerShell with Basic authentication
- Use the Exchange Online PowerShell with modern authentication using V2 module
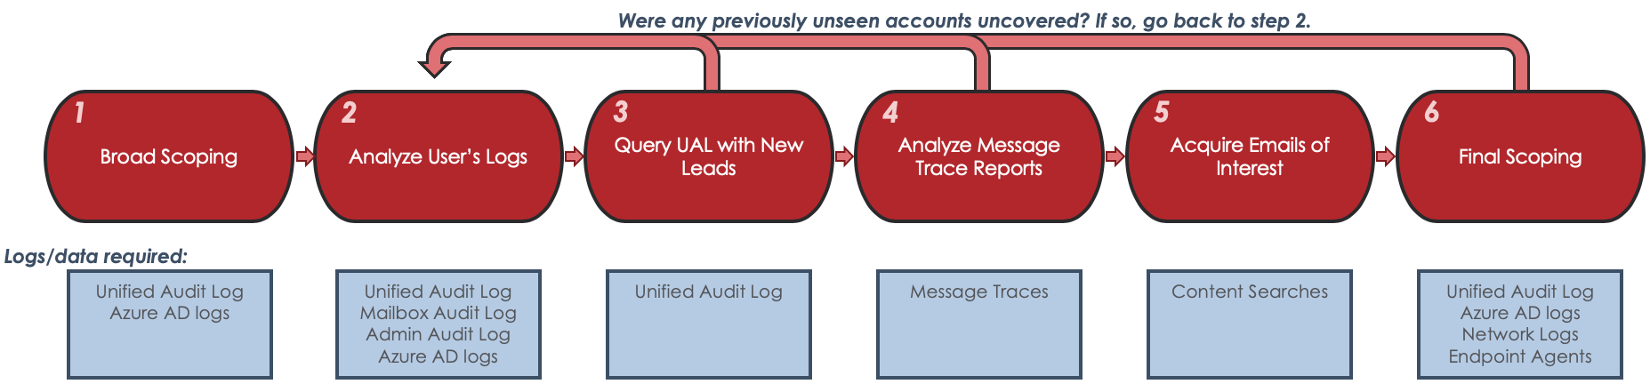
Broad Scoping
We start our investigations off by running broad queries against the Unified Audit Log (UAL) for suspicious activity. We’ll review OAuth activity too, which is especially important if something more nefarious than a financially motivated BEC is suspected. Any FireEye gear available to us—such as FireEye Helix and Email Security—will be leveraged to augment the data available to us from Office 365.
The following are a few initial scoping queries we’d typically run at the beginning of a Managed Defense engagement.
Scoping Recent Mailbox Rule Activity
Even in large tenants, pulling back all recent mailbox rule activity doesn’t typically produce an unmanageable number of results, and attacker-created rules tend to stand out from the rest of the noise.
Querying UAL for all mailbox rule activity in Helix:
| class=ms_office365 action:[New-InboxRule, Set-InboxRule, Enable-InboxRule] | table [createdtime, action, username, srcipv4, srcregion, parameters, rawmsg] |
Query UAL for new mail rule activity in PowerShell:
| Search-UnifiedAuditLog -StartDate (Get-Date).AddDays(-90) -EndDate (Get-Date) -ResultSize 5000 -Operations "New-InboxRule","Set-InboxRule","Enable-InboxRule" | Export-CSV \path\to\file.csv –NoTypeInformation -Encoding utf8 |
Scoping SMTP Forwarding Activity
SMTP forwarding is sometimes overlooked because it appears under a UAL operation separate from mailbox rules. This query looks for the Set-Mailbox operation containing a parameter to forward mail over SMTP, indicative of automatic forwarding being enabled from OWA.
Querying UAL for SMTP forwarding in Helix:
| class=ms_office365 action=Set-Mailbox rawmsg:ForwardingSmtpAddress | table [createdtime, action, username, srcipv4, srcregion, parameters, rawmsg] |
Querying UAL for SMTP forwarding in PowerShell:
| Search-UnifiedAuditLog -StartDate (Get-Date).AddDays(-90) -EndDate (Get-Date) -ResultSize 5000 -FreeText "ForwardingSmtpAddress" | Export-CSV \path\to\file.csv –NoTypeInformation -Encoding utf8 |
Analyze Compromised Users Logs
After we’ve finished scoping the tenant, we’ll turn our attention to the individual users believed to be involved in the compromise. We’ll acquire all relevant O365 logs for the identified compromised user(s) - this includes the user's UAL, Mailbox Audit Log (MAL), and Admin audit log (if the user is an administrator). We’ll review these logs for anomalous account activity and assemble a list of attacker IP addresses and User-Agents strings. We’ll use this list to further scope the tenant.
O365 investigations rely heavily on anomaly detection. Many times, the BEC actor may even be active at the same time as the user. In order to accurately differentiate between legitimate user activity and attacker activity within a compromised account, it's recommended to pull back as much data as possible to use as a reference for legitimate activity. Using the Helix query transforms groupby < [srccountry,srcregion], groupby < useragent and groupby < srcipv4, which highlight the least common geolocations, User Agent strings, and IP addresses, can also assist in identifying anomalies in results.
Querying UAL for a user in Helix:
| class=ms_office365 username=user@client.com | table [createdtime, action, username, srcipv4, srccountry, srcregion, useragent, rawmsg] | groupby < [srccountry,srcregion] |
Querying UAL for a user in PowerShell:
| Search-UnifiedAuditLog -StartDate mm/dd/yyyy -EndDate (Get-Date) -ResultSize 5000 -UserIds user@client.com | Export-CSV \path\to\file.csv –NoTypeInformation -Encoding utf8 |
Querying MAL for a user in PowerShell:
| Search-MailboxAuditLog -Identity user@client.com -LogonTypes Owner,Delegate,Admin -ShowDetails -StartDate (Get-Date).AddDays(-90) -EndDate (Get-Date) | Export-CSV \path\to\file.csv –NoTypeInformation -Encoding utf8 |
Querying Admin Audit Log for all events within a certain date in PowerShell:
| Search-AdminAuditLog -StartDate mm/dd/yyyy -EndDate mm/dd/yyyy | Export-CSV \path\to\file.csv –NoTypeInformation -Encoding utf8 |
Query UAL with New Leads
Now that we’ve built a list of suspicious IP addresses (or even entire CIDR ranges) and User-Agent strings, we’ll run new queries against the entire UAL to try to identify other compromised user accounts. We’ll repeat this step and the previous step for each newly identified user account.
One advantage to using FireEye Helix platform over PowerShell is that we can query entire CIDR ranges. This is helpful when we observe attackers coming from a VPN or ISP that dynamically assigns IP addresses within the same address block.
Queries for attacker User-Agent strings usually generate more noise to sift through than IP address searches. In practice, User-Agent queries are only beneficial if the attackers are using an uncommon browser or version of a browser. Due to limitations of the Search-UnifiedAuditLog cmdlet, we’ve had the most success using the FreeText parameter and searching for simple strings.
In Helix:
| class=ms_office365 (srcipv4:[1.2.3.4, 2.3.4.0/24] OR useragent:Opera) | table [createdtime, action, username, srcipv4, srccountry, srcregion, useragent, rawmsg] | groupby username |
Querying the UAL for IPs and user agents in PowerShell:
| Search-UnifiedAuditLog -StartDate mm/dd/yyyy -EndDate (Get-Date) -ResultSize 5000 -IPAddresses 1.2.3.4, 2.3.4.5 | Export-CSV \path\to\file.csv –NoTypeInformation -Encoding utf8 |
| Search-UnifiedAuditLog -StartDate mm/dd/yyyy -EndDate (Get-Date) -ResultSize 5000 -FreeText "Opera" | Export-CSV \path\to\file.csv –NoTypeInformation -Encoding utf8 |
Analyze Message Traces
We’ll use PowerShell to query message traces for the compromised users we’ve identified. If the email was sent within the past 10 days, use the Get-MessageTrace cmdlet, which immediately returns results and allows teams to query IP addresses. For older emails, use the Start-HistoricalSearch cmdlet and download the report later from the Mail Flow section of the Security & Compliance center.
Querying for the last 10 days of mail sent by the victim in PowerShell:
| Get-MessageTrace -StartDate (Get-Date).AddDays(-10) -EndDate (Get-Date) -SenderAddress victim@client.com | Select-Object Received, SenderAddress, RecipientAddress, Subject, Status, FromIP, Size, MessageID | Export-CSV \path\to\file.csv –NoTypeInformation -Encoding utf8 |
Querying for older emails (up to 90 days) in PowerShell:
| Start-HistoricalSearch -ReportTitle "Mandiant O365 investigation" -StartDate mm/dd/yyyy -EndDate mm/dd/yyyy -ReportType MessageTraceDetail -SenderAddress victim@client.com |
As Message Trace results are reviewed, attention should be given to IP addresses to determine which emails were sent by attackers. If phishing was the suspected initial compromise vector, it’s a good idea to also query for incoming mail received within a few days prior to the first compromise date and look for suspicious sender addresses and/or subject lines.
Acquire Emails of Interest
With our list of suspicious emails identified from message traces, we’ll use the Content Search tool available in the Office 365 Security and Compliance Center acquire the email body and learn what domains were used in phishing lures (if phishing was present). Content Searches are performed by using a straightforward GUI, and the results can either be previewed in the browser, downloaded individually as EML files, or downloaded in bulk as PST files.
Final Scoping
At this point of our investigation, the BEC should be sufficiently scoped within the tenant. To ensure any follow-on activity hasn’t occurred, we’ll take all of the attack indicators and perform our final queries across the UAL.
With that said, there are still edge cases in which attacker activity wouldn’t appear in O365 logs. For example, perhaps an additional user has submitted their credentials to a phishing page, but the attackers haven’t used them to log in yet. To ensure we don’t miss this activity, we’ll perform additional scoping across available network logs, specifically for IP addresses and domains related to the attacker’s phishing infrastructure. We’ll also leverage other FireEye products, such as the Endpoint Security platform, to search for phishing domains present on a host’s web browser history.
Conclusion
Unauthorized access to O365 tenant doesn’t just pose a threat to an organization, but also to its staff and business partners. Organizations without enhanced security controls in O365 are at the greatest risk of experiencing a BEC. However, as multi factor-authentication becomes more and more commonplace, we’ve witnessed an increase of MFA bypass attempts performed by increasingly proficient attackers.
It’s important to remember that social engineering plays a primary role throughout a BEC. Ensure that users are trained on how to identify credential harvesting forms, a common compromise vector. When in the midst of a BEC compromise, teams may want to promptly alert personnel in HR and finance-related roles to exercise extra caution when processing requests related to banking or wire transfers while the investigation is in progress.
The examples covered in this blog post are just a sample of what Managed Defense performs while investigating an Office 365 compromise. To take a proactive approach at preventing BECs, make sure the following best practices are implemented in a O365 tenant. Additionally, FireEye Email Security offers protections against phishing and the Helix platform’s O365 ruleset can alert on anomalous activity as soon as it happens.
Recommended Best Practices
- Ensure mailbox audit logging is enabled on all accounts
- Disable Legacy Authentication protocols
- Enable multi-factor authentication (MFA)
- Enforce strong passwords and a password expiration policy
- Forward O365 audit logs to a centralized logging platform for extended retention
- Enforce an account lockout policy in Azure/on-premise Active Directory
- Restrict mail forwarding to external domains
Acknowledgements
Special thanks to Doug Bienstock, Glenn Edwards, Josh Madeley, and Tim Martin for their research and assistance on the topic.
Prepare for 2024's cybersecurity landscape.
Get the Google Cloud Cybersecurity Forecast 2024 report to explore the latest trends on the horizon.