


Commando VM 2.0: Customization, Containers, and Kali, Oh My!
The Complete Mandiant Offensive Virtual Machine (“Commando VM”) swept the penetration testing community by storm when it debuted in early 2019 at Black Hat Asia Arsenal. Our 1.0 release made headway featuring more than 140 tools. Well now we are back again for another spectacular release, this time at Black Hat USA Arsenal 2019! In this 2.0 release we’ve listened to the community and implemented some new must have features: Kali Linux, Docker containers, and package customization.
About Commando VM
Penetration testers commonly use their own variants of Windows machines when assessing Active Directory environments. We specifically designed Commando VM to be the go-to platform for performing internal penetration tests. The benefits of using Commando VM include native support for Windows and Active Directory, using your VM as a staging area for command and control (C2) frameworks, more easily (and interactively) browsing network shares, and using tools such as PowerView and BloodHound without any worry about placing output files on client assets.
Commando VM uses Boxstarter, Chocolatey, and MyGet packages to install software and delivers many tools and utilities to support penetration testing. With over 170 tools and growing, Commando VM aims to be the de facto Windows machine for every penetration tester and red teamer.
Recent Updates
Since its initial release at Black Hat Asia Arsenal in March 2019, Commando VM has received three additional updates, including new tools and/or bug fixes. We closed 61 issues on GitHub and added 26 new tools. Version 2.0 brings three major new features, more tools, bug fixes, and much more!
Kali Linux
In 2016 Microsoft released the Windows Subsystem for Linux (WSL). Since then, pentesters have been trying to leverage this capability to squeeze more productivity out of their Window systems. The fewer Virtual Machines you need to run, the better. With WSL you can install Linux distributions from the Windows Store and run common Linux commands in a terminal such as starting up an SSH, MySQL or Apache server, automating mundane tasks with common scripting languages, and utilizing many other Linux applications within the same Windows system.
In January 2018, Offensive Security announced support for Kali Linux in WSL. With our 2.0 release, Commando VM officially supports Kali Linux on WSL. To get the most out of Kali, we've also included VcXsrv, an X Server that allows us to display the entire Linux GUI on the Windows Desktop (Figure 1). Displaying the Linux GUI and passing windows to Windows had been previously documented by Offensive Security and other professionals, and we have combined these to include the GUI as well as shortcuts to take advantage of popular programs such as Terminator (Figure 2) and DirBuster (Figure 3).

Figure 1: Kali XFCE on WSL with VcXsrv
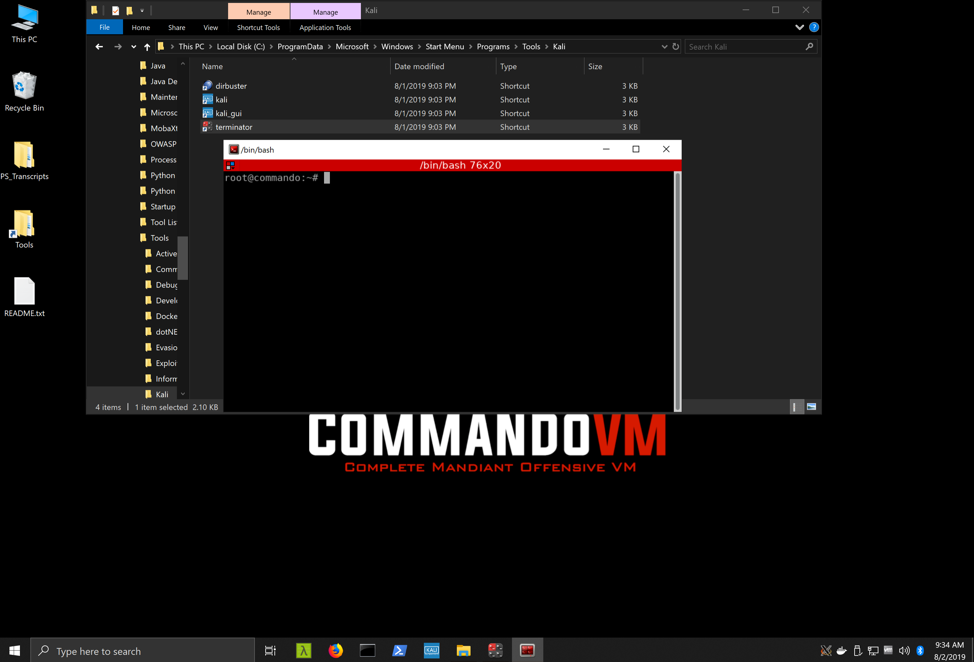
Figure 2: Terminator on Commando VM – Kali WSL with VcXsrv
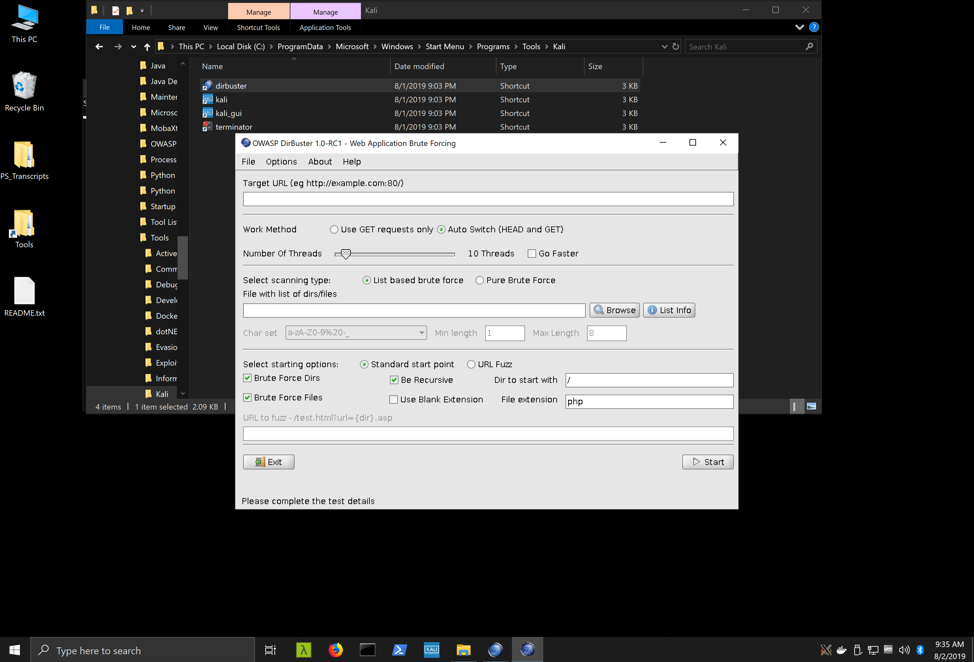
Figure 3: DirBuster on Commando VM – Kali WSL with VcXsrv
Docker
Docker is becoming increasingly popular within the penetration testing community. Multiple blog posts exist detailing interesting functionality using Docker for pentesting. Based on its popularity Docker has been on our roadmap since the 1.0 release in March 2019, and we now support it with our release of Commando VM 2.0. We pull tools such as Amass and SpiderFoot and provide scripts to launch the containers for each tool. Figure 4 shows an example of SpiderFoot running within Docker.
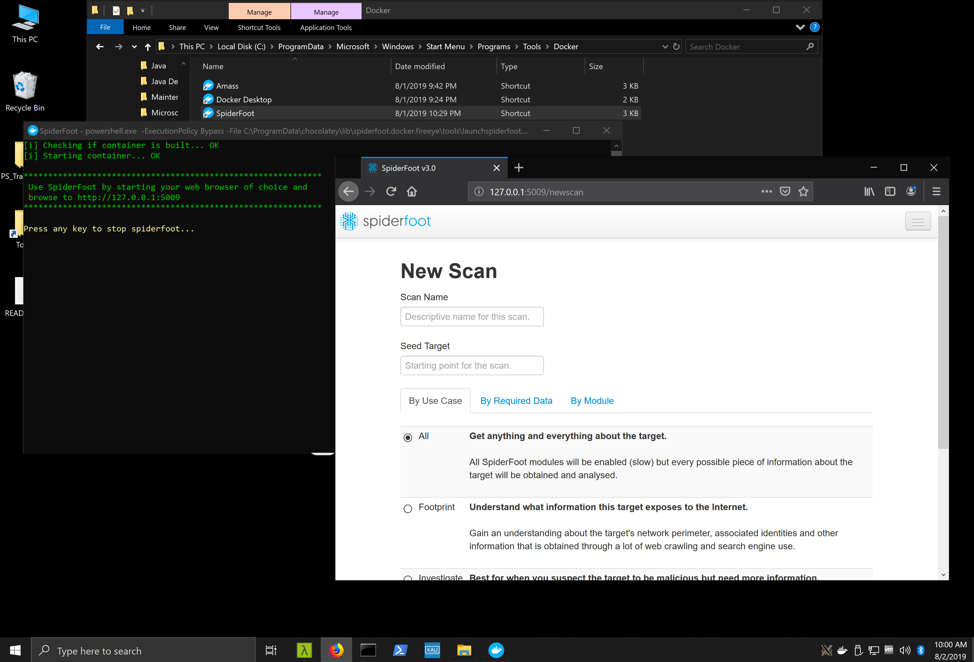
Figure 4: Impacket container running on Docker
For command line docker containers, such as Amass, we created a PowerShell script to automatically run Amass commands through docker. This script is also added to the PATH, so users can call amass from anywhere. This script is shown in Figure 5. We encourage users to come up with their own scripts to do more creative things with Docker.
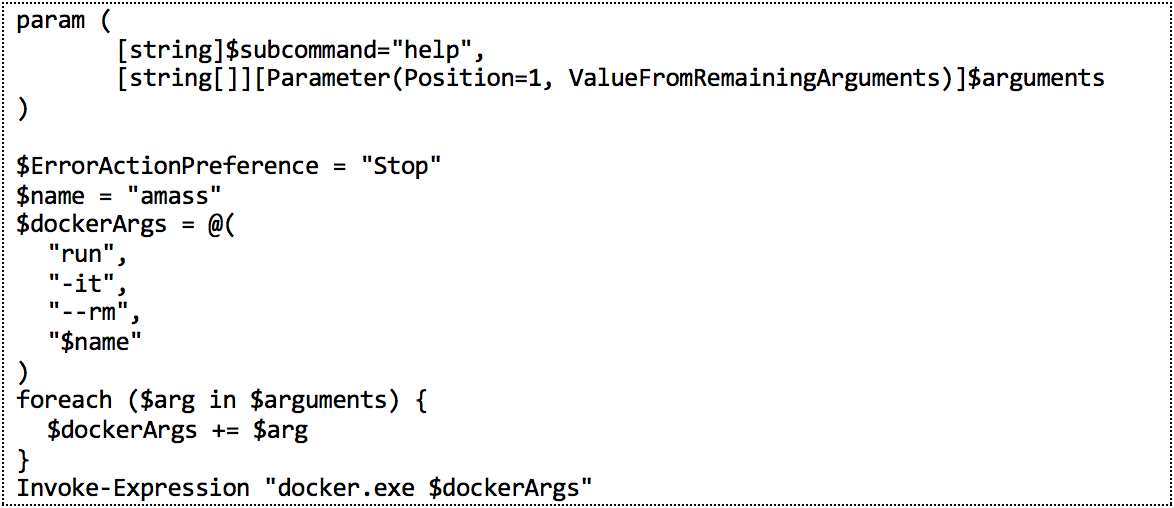
Figure 5: Amass.ps1 script
This script is also executed when the shortcut is opened.
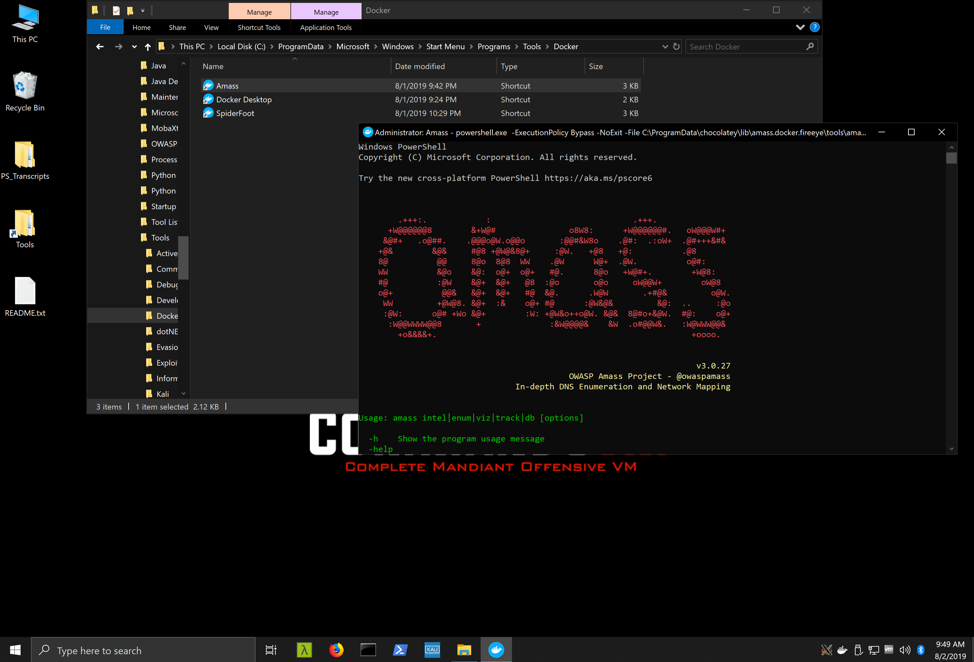
Figure 6: Amass Docker container executed via PowerShell script
Customization
Not everyone needs all of the tools all of the time. Some tools can extend the installation process by hours, take up many gigabytes of hard drive space, or come with unsuitable licenses and user agreements. On the other hand, maybe you would like to install additional reversing tools available within our popular FLARE VM; or you would prefer one of the many alternative text editors or browsers available from the chocolatey community feed. Either way, we would like to provide the option to selectively install only the packages you desire. Through customization you and your organization can also share or distribute the profile to make sure your entire team has the same VM environment. To provide for these scenarios, the last big change for Commando 2.0 is the support for installation customization. We recommend using our default profile, and removing or adding tools to it as you see fit. Please read the following section to see how.
How to Create a Custom Install
Before we start, please note that after customizing your own edition of Commando VM, the cup all command will only upgrade packages pre-installed within your customized distribution. New packages released by our team in the future will not be installed or upgraded automatically with cup all. When needed, these new packages can always be installed manually using the cinst or choco install command, or by adding them to your profile before a new install.
Simple Instructions
- Download the zip from https://github.com/fireeye/commando-vm into your Downloads folder.
- Decompress the zip and edit the ${Env:UserProfile}\Downloads\commando-vm-master\commando-vm-master\profile.json file by removing tools or adding tools in the “packages” section. Tools are available from our package list or from the chocolatey repository.
- Open an administrative PowerShell window and enable script execution.
- Set-ExecutionPolicy Unrestricted -f
- Change to the unzipped project directory.
- cd ${Env:UserProfile}\Downloads\commando-vm-master\commando-vm-master\
- Execute the install with the -profile_file argument.
- .\install.ps1 -profile_file .\profile.json
Detailed Instructions
To start customizing your own distribution, you need the following three items* from our public GitHub repository:
- Our install.ps1 script
- Our sample profile.json
- An installation template. We recommend using commandovm.win10.install.fireeye.
*Note: If you download the project ZIP from GitHub it will contain all three items.
The install script will now support an optional -profile_file argument, which specifies a JSON profile. Without the -profile_file argument, running .\install.ps1 will install the default Commando VM distribution. To customize your edition of Commando VM, you need to create a profile in JSON format, and then pass that to the -profile_file argument. Let us explore the sample profile.json profile (Figure 7).
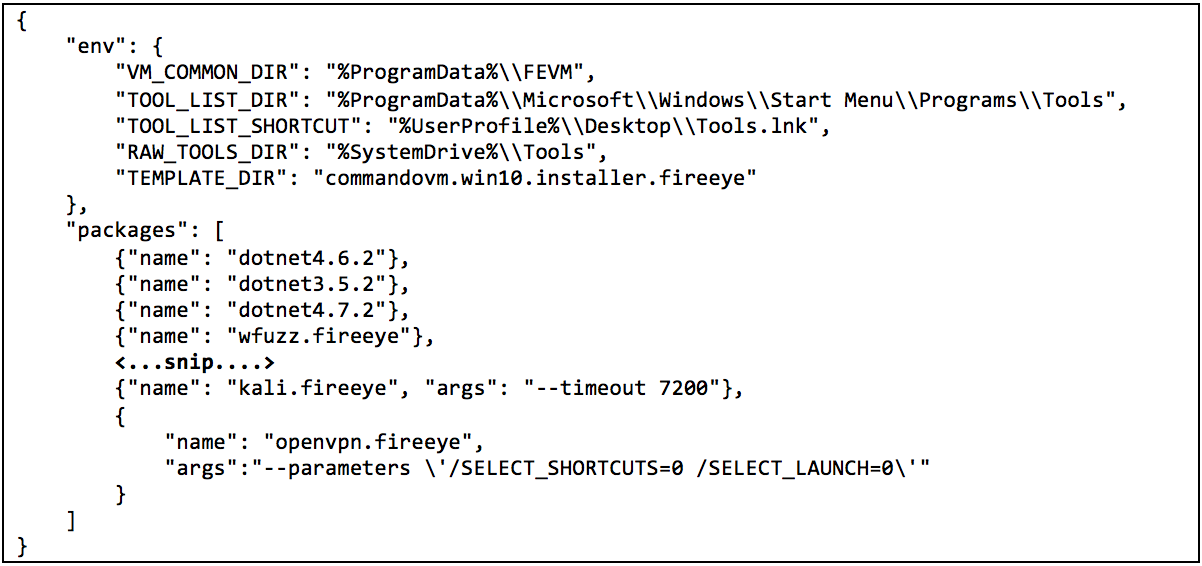
Figure 7: profile.json profile
This JSON profile starts with the env dictionary which specifies many environment variables used by the installer. These environment variables can, and should, be left to their default values. Here is a list of the supported environment variables:
- VM_COMMON_DIR specifies where the shared libraries should be installed on the VM. After a successful install, you will find a FireEyeVM.Common directory within this location. This contains a PowerShell module that is shared by our packages.
- TOOL_LIST_DIR and TOOL_LIST_SHORTCUT specify which directory contains the list of all installed packages within the Start Menu and the name of the desktop shortcut, respectively.
- RAW_TOOLS_DIR environment variable specifies the location where some tools will be installed. Chocolatey defaults to installing tools in %ProgramData%\Chocolatey\lib. This environment variable by default points to %SystemDrive%\Tools, allowing you to more easily access some tools on the command line.
- And, finally, TEMPLATE_DIR specifies a template package directory relative to where install.ps1 is on disk. We strongly recommend using the commandovm.win10.installer.fireeye package available on our GitHub repository as the template. If your VM is running Windows 7, please switch to the appropriate commandovm.win7.installer.fireeye package. If you are feeling “hacky” and adventurous, feel free to customize the installer further by modifying the chocolateyinstall.ps1 and chocolateyuninstall.ps1 scripts within the tools directory of the template. Note that a proper template will be a folder containing at least 5 things: (1) a properly formatted nuspec file, (2) a “tools” folder that contains (3) a chocolateyinstall.ps1 file, (4) a chocolateyuninstall.ps1 file, and (5) a profile.json file. If you use our template, the only thing you need to change is the packages.json file. The easiest way to do this is just download and extract the commando-vm zip file from GitHub.
With the packages variables set, you can now specify which packages to install on your own distribution. Some packages accept additional installation arguments. You can see an example of this by looking at the openvpn.fireeye entry. For a complete list of packages available from our feed, please see our package list.
Once you finish modifying your profile, you are ready for installation. Run powershell.exe with elevated privileges and execute the following commands to install your own edition of Commando VM, assuming you saved your version of the profile named: myprofile.json (Figure 8).

Figure 8: Example myprofile.json
The myprofile.json file can then be shared and distributed throughout your entire organization to ensure everyone has the same VM environment when installing Commando VM.
Conclusion
Commando VM was originally designed to be the de facto Windows machine for every penetration tester and red teamer. Now, with the addition of Kali Linux support, Docker and installation customization, we hope it will be the one machine for all penetration testers and red teamers. For a complete list of tools, and for the installation script, please see the Commando VM GitHub repository. We look forward to addressing user feedback, adding more tools and features, and creating many more enhancements for this Windows attack platform.
Prepare for 2024's cybersecurity landscape.
Get the Google Cloud Cybersecurity Forecast 2024 report to explore the latest trends on the horizon.