


Introduction to Reverse Engineering Cocoa Applications
While not as common as Windows malware, there has been a steady stream of malware discovered over the years that runs on the OS X operating system, now rebranded as macOS. February saw three particularly interesting publications on the topic of macOS malware: a Trojan Cocoa application that sends system information including keychain data back to the attacker, a macOS version of APT28’s Xagent malware, and a new Trojan ransomware.
In this blog, the FLARE team would like to introduce two small tools that can aid in the task of reverse engineering Cocoa applications for macOS. In order to properly introduce these tools, we will lay a bit of foundation first to introduce the reader to some Apple-specific topics. Specifically, we will explain how the Objective-C runtime complicates code analysis in tools such as IDA Pro, and how to find useful entry points into a Cocoa application’s code where you can begin analysis.
If you find these topics fascinating or if you want to be better prepared to investigate macOS malware in your own environment, come join us for a two-day crash course on this topic that we will be teaching at Black Hat Asia and Black Hat USA this year.
Cocoa Application Anatomy
When we use the term “Cocoa application”, we are referring to an application that is built using the AppKit framework, which belongs to what Apple refers to as the Cocoa Application Layer. In macOS, applications are distributed in an application bundle, a directory structure made to appear as a single file containing executable code and its associated resources, as illustrated in Figure 1.
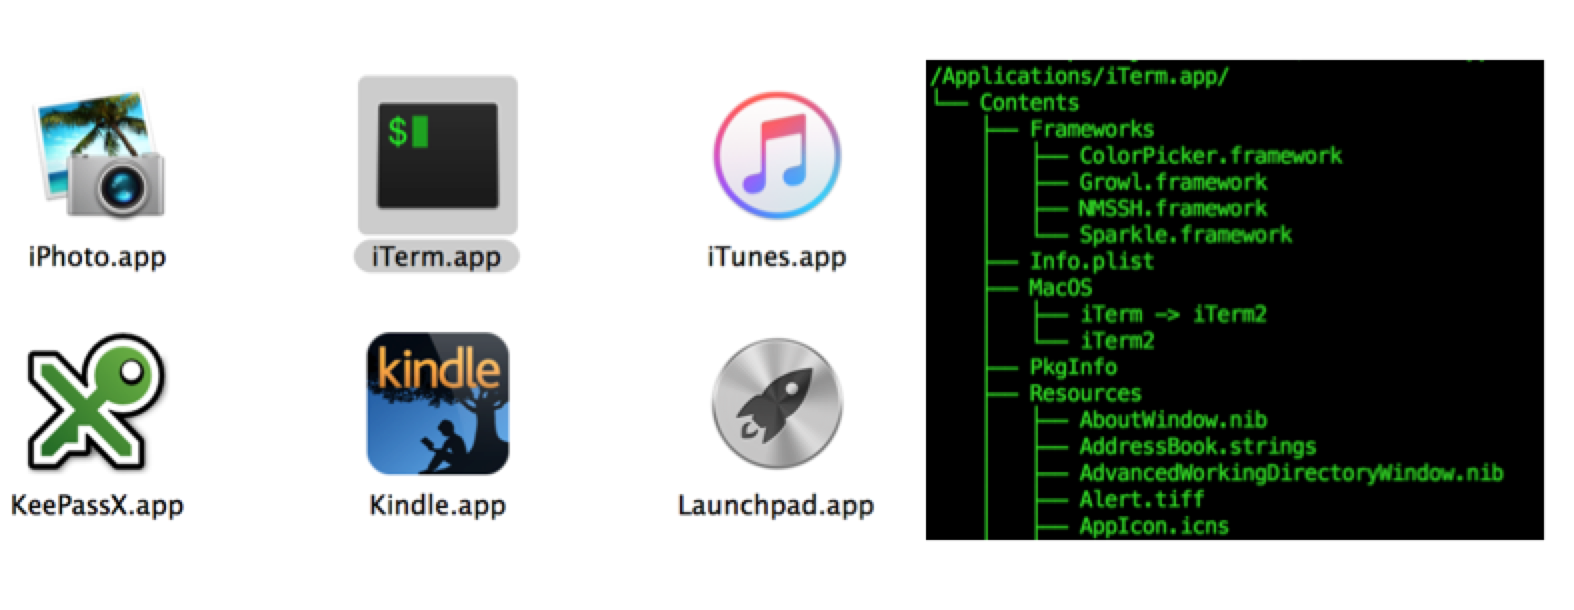
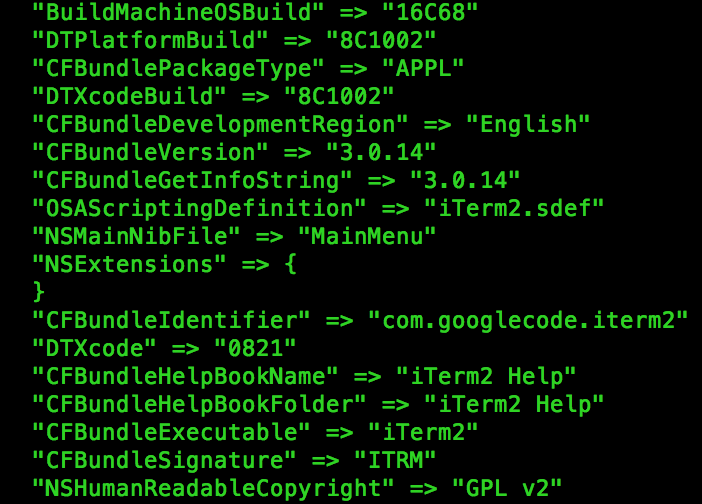
These bundles can contain a variety of different files, but all bundles must contain at least two critical files: Info.plist and an executable file residing in the MacOS folder. The executable file can be any file with execute permissions, even a python or shell script, but it is typically a native executable. Mach-O is the native executable file format for macOS and iOS. The Info.plist file describes the application bundle, containing critical information the OS needs in order to properly load it. Plist files can be in one of three possible formats: XML, JSON, or a proprietary binary format called bplist. A handy utility named plutil is available in macOS that allows you to convert between formats, or simply pretty-print a plist file regardless of its format. The most notable key in the Info.plist file is the CFBundleExecutable key, which designates the name of the executable in the MacOS folder that will be executed. Figure 2 shows a snippet of the pretty-printed output from plutil for the iTerm application’s Info.plist file.
Objective-C
Cocoa applications are typically written in Objective-C or Swift. Swift, the newer of the two languages, has been quickly catching up to Objective-C in popularity and appears to have overtaken it. Despite this, Objective-C has many years over Swift, which means the majority of malicious Cocoa applications you will run into will be written in Objective-C for the time being. Additionally, older Objective-C APIs tend to be encountered during malware analysis. This can be due to the age of the malware or for the purpose of backwards compatibility. Objective-C is a dynamic and reflective programming language and runtime. Roughly 10 years ago, Objective-C version 2.0 was released, which included major changes to both the language and the runtime. Where details are concerned, this blog is referring to version 2.0.
Programs written in Objective-C are transformed into C as part of the compilation process, making it at least a somewhat comfortable transition for most reverse engineers. One of the biggest hurdles to such a transition comes in how methods are called in Objective-C. Objective-C methods are conceptually similar to C functions; they are a unit of code that performs a specific task, optionally taking in parameters and returning a value. However, due to the dynamic nature of Objective-C, methods are not normally called directly. Instead, a message is sent to the target object. The name of a method is called a selector, while the actual function that is executed is called an implementation. The message specifies a reference to the selector that is to be invoked along with any method parameters. This allows for features like “method swizzling,” in which an application can change the implementation for a given selector. The most common way in which messages are sent within Objective-C applications is the objc_msgSend function. Figure 3 provides a small snippet of Objective-C code that opens a URL in your browser. Figure 4 shows this same code represented in C.


As you can see, the Objective-C code between the brackets amounts to a call to objc_msgSend.
Unfortunately, this message sending mechanism causes problems when trying to follow cross-references for selectors in IDA Pro. While you can easily see all the cross-references for a given selector from any location where it is referenced, the implementations themselves are not called or referenced directly and so there is no easy way to jump from a selector reference to its implementation or vice-versa. Figure 5 illustrates this problem by showing that the only cross-reference to an implementation is in the __objc_const section of the executable, where the runtime stores class member data.

Of course, the information that links these selector references to their implementations is stored in the executable, and thankfully IDA Pro can to parse this data for us. In the __objc_const section, a structure identified by IDA Pro as __objc2_meth has the definition illustrated in Figure 6.

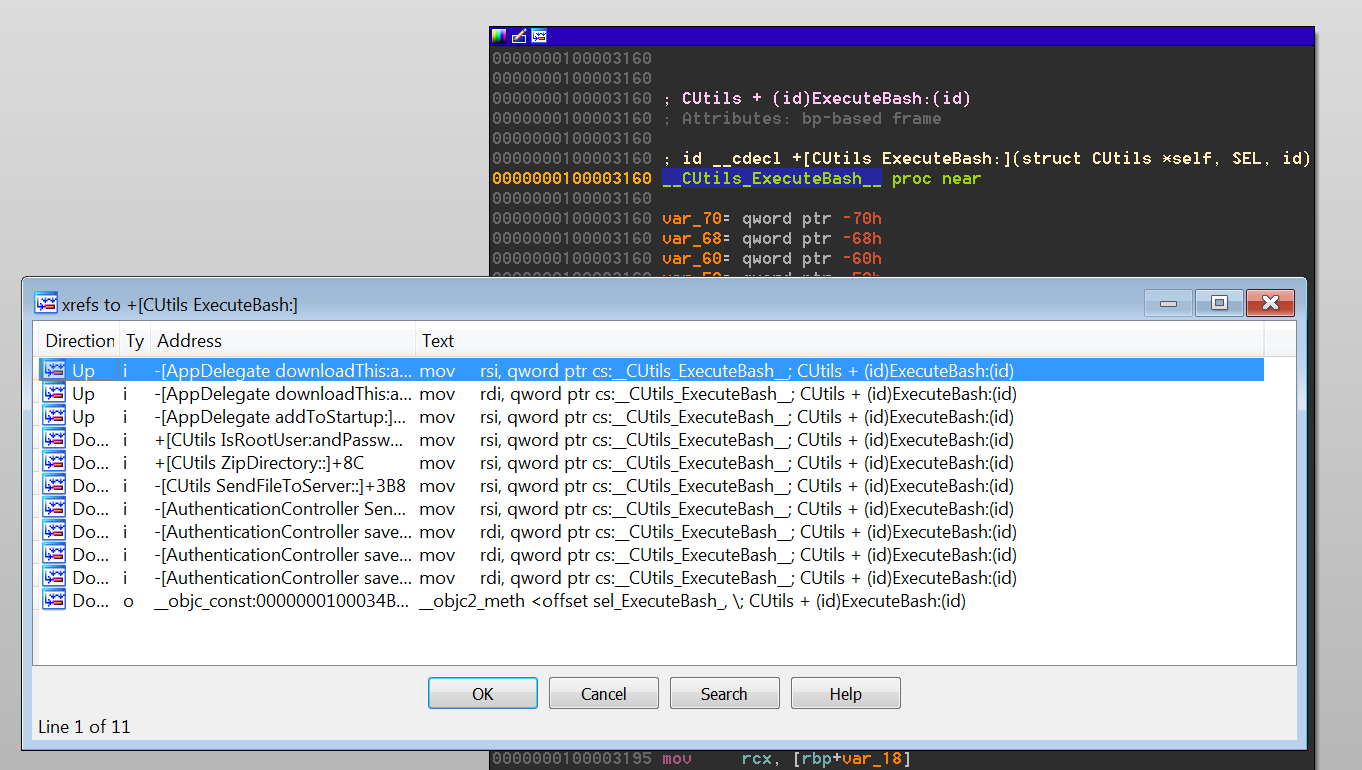
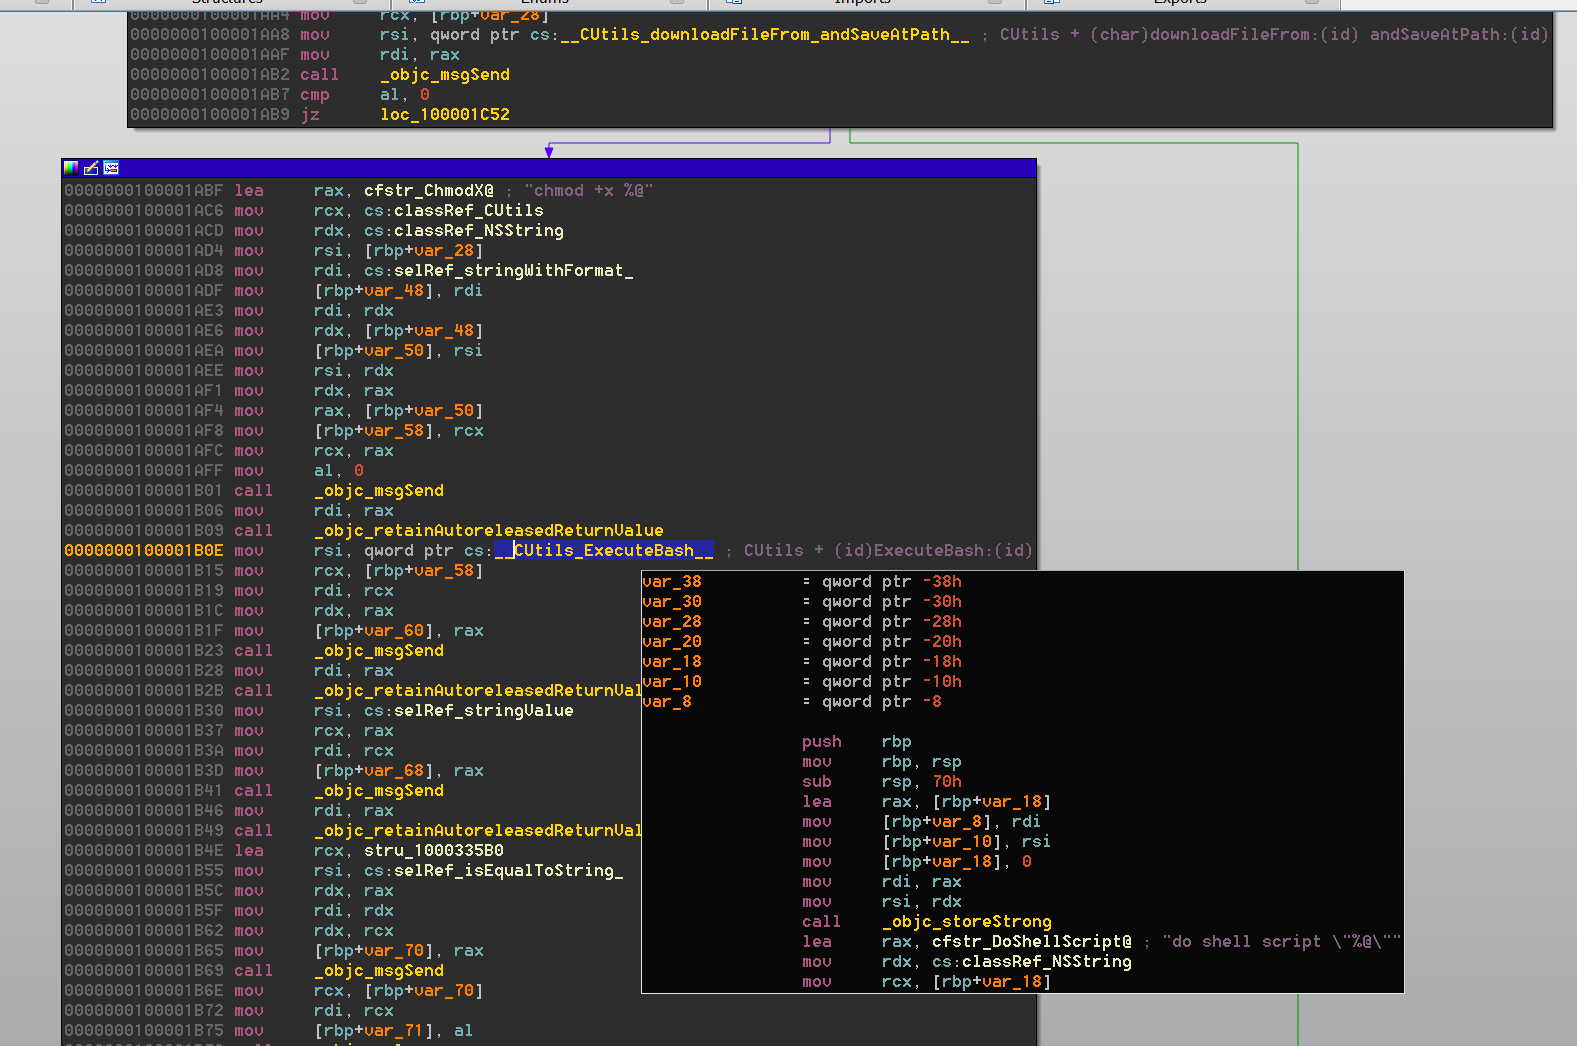
The first field of this structure is the selector for the method. One of the cross-references to this field brings us to the __objc_selrefs section of the executable where you can find the selector reference. Following the cross-references of the selector reference will reveal to us any locations in the code where the selector is used. The third field of the structure points to the implementation of the selector, which is the function we want to analyze. What is left to do is simply use this data to create the cross-references. The first of the two tools we are introducing is an IDAPython script named objc2_xrefs_helper.py that does just that for x86_64 Mach-O executable files using Objective-C 2.0. This script is similar to older IDAPython scripts released by Zynamics, however their scripts do not support the x86_64 architecture. Our script is available along with all of our other scripts and plugins for IDA Pro from our Github repo. For each Objective-C method that is defined in the executable, objc2_xrefs_helper.py patches the instructions that cross-reference its selector to reference the implementing function itself and creates a cross-reference from the referencing instruction to the implementation function. Using this script allows us to easily transition from a selector’s implementation to its references and vice-versa, as shown in Figure 7 and Figure 8.
There is a noteworthy shortcoming to this tool, however. If more than one class defines a method with the same name, there will only be one selector present in the executable. For now, the tool ignores these ambiguous selectors.
Cocoa Applications – Where to Begin Looking?
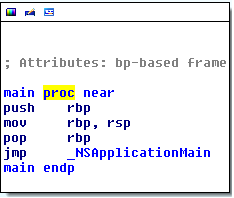
Another quandary with reverse engineering Cocoa applications, or any application built with an application framework, is determining where the framework’s code ends and the author’s code begins. With programs written in C/C++, the author’s code would typically begin within the main function of the program. While there are many exceptions to this rule, this is generally the case. For programs using the Cocoa Application template in Apple’s IDE, Xcode, the main function simply performs a tail jump into a function exported by the AppKit framework named NSApplicationMain, as shown in Figure 9.
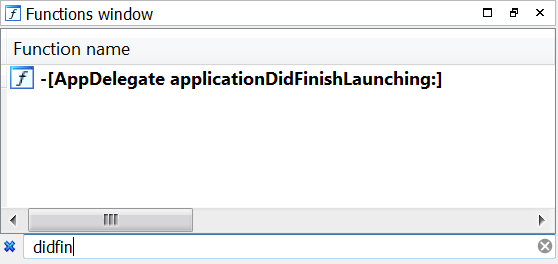
So where do we look to find the first lines of code written by the application’s author that would be executed? The answer to that question lies within NSApplicationMain. In summary, NSApplicationMain performs three important steps: constructing the NSApplication object, loading the main storyboard or nib file, and starting the event loop. The NSApplication object plays the important role of event and notification coordinator for the running application. NSApplicationMain looks for the name of this class in the NSPrincipalClass key in the Info.plist file of the application bundle. Xcode simply sets this key to the NSApplication class, but this class may be subclassed or reimplemented and the key overwritten. A noteworthy notification that is coordinated by the NSApplication object is NSApplicationDidFinishLaunchingNotification, which is designated as the proper time to run any application-specific initialization code the author may have. To handle this notification, the application may designate a delegate class that adheres to the NSApplicationDelegate protocol. In Objective-C, a protocol fills the role traditionally referred to as an interface in object-oriented parlance. The relevant method in this protocol for encapsulating initialization code is the applicationDidFinishLaunching method. By default, Xcode creates this delegate class for you and names it AppDelegate. It even defines an empty applicationDidFinishLaunching method for the application developer to modify as desired. With all this information in hand, the best place to look for the initial code of most Cocoa applications is in a method named applicationDidFinishLaunching, as shown in Figure 10.
If you find nothing useful, then fall back to analyzing the main function. It is important to note that all this information is specific to apps created using the Cocoa Application template in Xcode. Cocoa applications do not need to use NSApplicationMain. One can write their own Cocoa application from scratch, implementing his or her own version of NSApplicationMain.
Interface Builder and Nib Files
It was previously mentioned that one of the main responsibilities of NSApplicationMain is to load the main storyboard or nib file. “Nib” stands for NeXTSTEP Interface Builder, referring to the Interface Builder application that is a part of Xcode. Interface Builder allows developers to easily build graphical user interfaces and even wire their controls to variables and methods within their code using a graphical interface. As a developer builds GUIs with Interface Builder, graphs of objects are formed. An object graph is saved in XML format in a .xib file in the project folder. When the project is built, each object graph is serialized using the NSKeyedArchiver class and stored in Apple’s bplist format in a .nib file within the application bundle, typically under the Resources folder. Xcode writes the name of the main nib file to the application’s Info.plist file under the key NSMainNibFile. When an application loads a nib file, this object hierarchy is unpacked into memory and all the connections between various GUI windows, menus, controls, variables, and methods are established. This list of connections includes the connection between the application delegate and the NSApplication class. Storyboards were added to macOS in Yosemite. They enable the developer to lay out all of the application’s various views that will be shown to the user and specify their relationships. Under the hood, a storyboard is a directory containing nib files and an accompanying Info.plist file. The main storyboard directory is designated under the key NSMainStoryboardFile in the application’s Info.plist file.
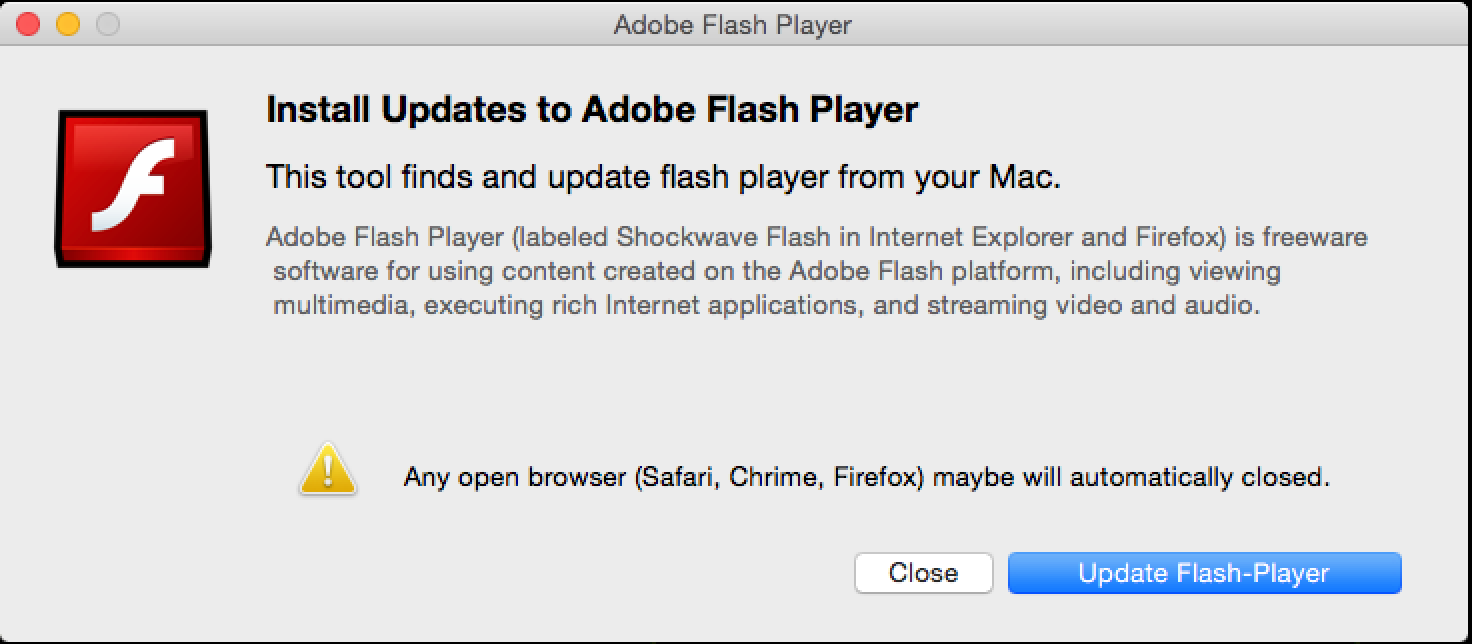
This brings us to the other tool we would like to share, nib_parse.py, which is available from our Github repo. nib_parse.py uses ccl_bplist to decode and deserialize a nib file and print out the list of connections defined within it. For each connection, it prints the label for the connection (typically a method or variable name) and the source and destination objects’ classes. Each object encoded by NSKeyedArchiver is assigned a unique numeric identifier value that is included in the output within enclosed parentheses. For appropriate GUI elements that have textual data associated with them, such as button labels, the text is included in the script output within enclosed brackets. With this information, one can determine the relationships between the code and the GUI elements. It is even possible to rewire the application, changing which functions handle different GUI events. Note that if a nib is not flattened, it will be represented as a directory that contains nib files and you can run this tool on the keyedobjects.nib file located within it instead. For storyboards, you can run this tool on the various nib files present in the storyboard directory. Figure 11 shows the output of nib_parse.py when it is used on the MainMenu.nib file from the recently discovered MacDownloader threat shown in Figure 12. You may notice that the GUI text in the tool output does not match the GUI text in the screenshot. In this case, many of the GUI elements are altered at run-time in the code illustrated in Figure 13.
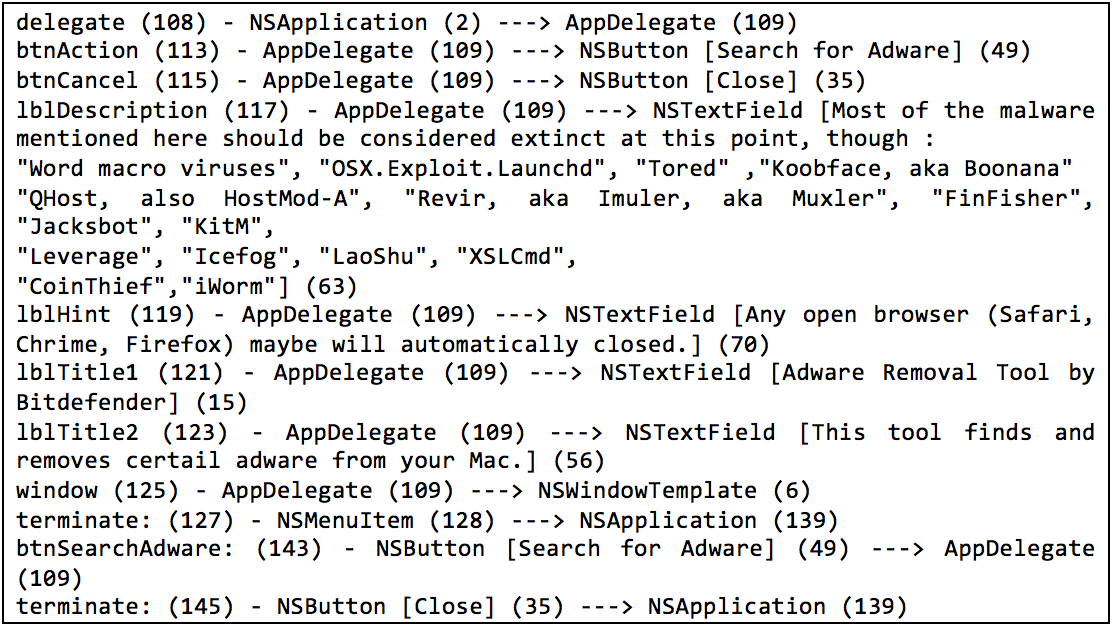
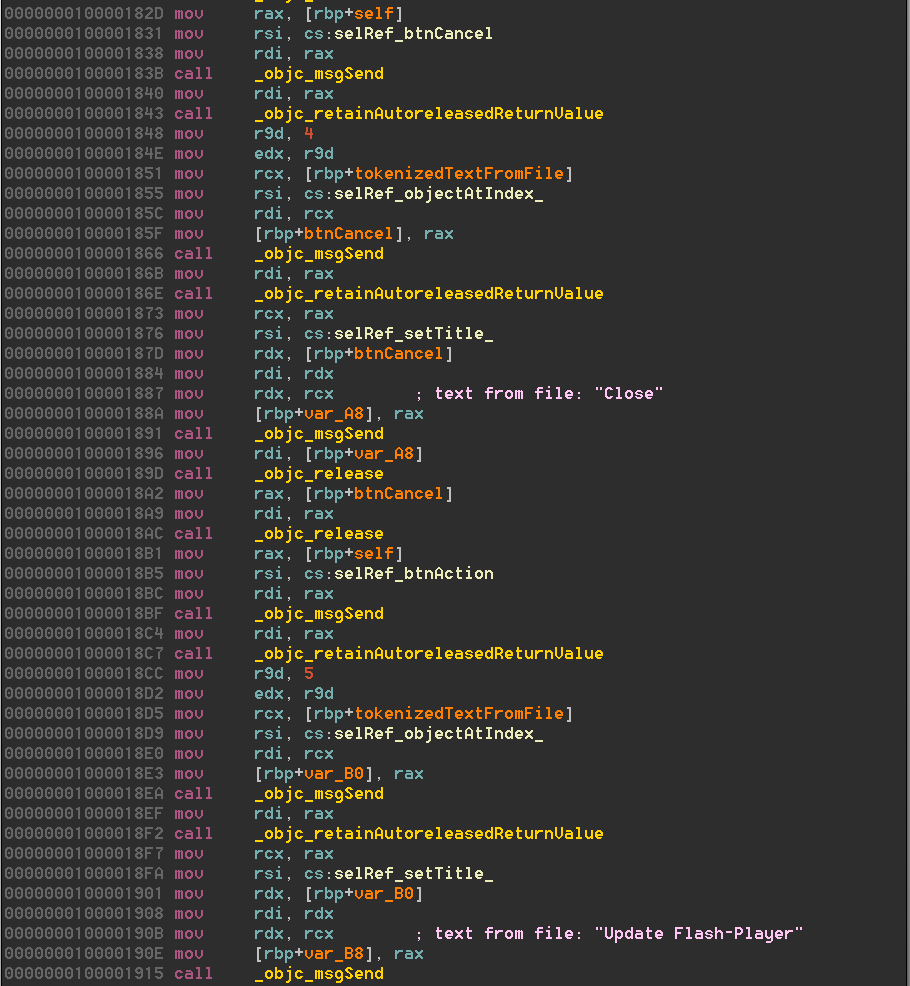
The output from nib_parse.py shows that the author used the default delegate class AppDelegate provided by Xcode. The AppDelegate class has two instance variables for NSButton objects along with four instance variables for NSTextField objects. A selector named btnSearchAdware is connected to the same button with id (49) as the instance variable btnAction. This is likely an interesting function to begin analysis.
Summary
We hope you have enjoyed this whirlwind tour of reverse engineering Cocoa applications. If you are interested in getting some more exposure to macOS internals and analysis tools, reverse engineering and debugging techniques, and real macOS malware found in the wild, then come hang out with us at Black Hat this year and learn more!
Prepare for 2024's cybersecurity landscape.
Get the Google Cloud Cybersecurity Forecast 2024 report to explore the latest trends on the horizon.